Article 12 from 30 : How to use MVC web project for auto-hosted and provider-hosted sharepoint apps

This post is article 12 from the 30 Articles App series for SharePoint

Today, I will discuss about how you can use the MVC4 web project with your provider or Auto hosted app. And so you can take all the advantages of the latest MVC 4 features with SharePoint Apps.

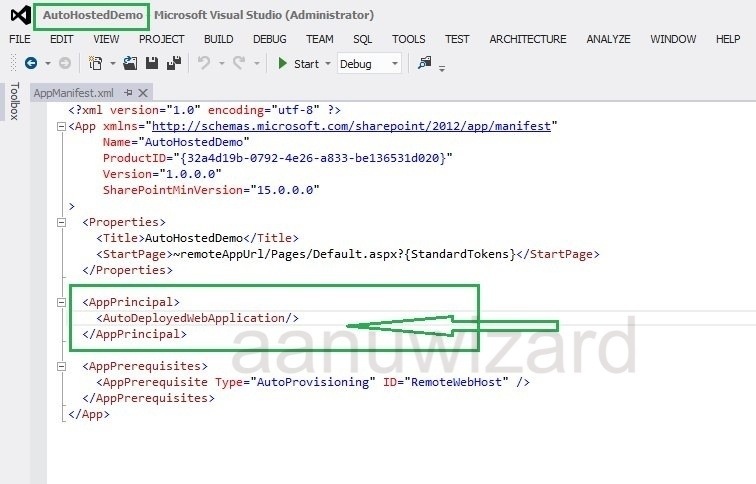
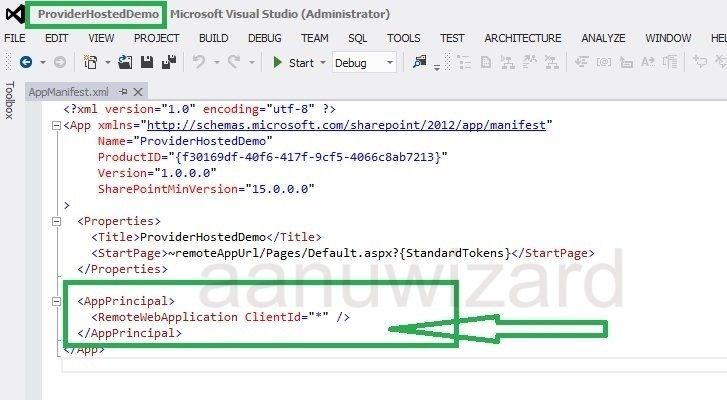
1) Let’s start with auto/Provider hosted App with default template.

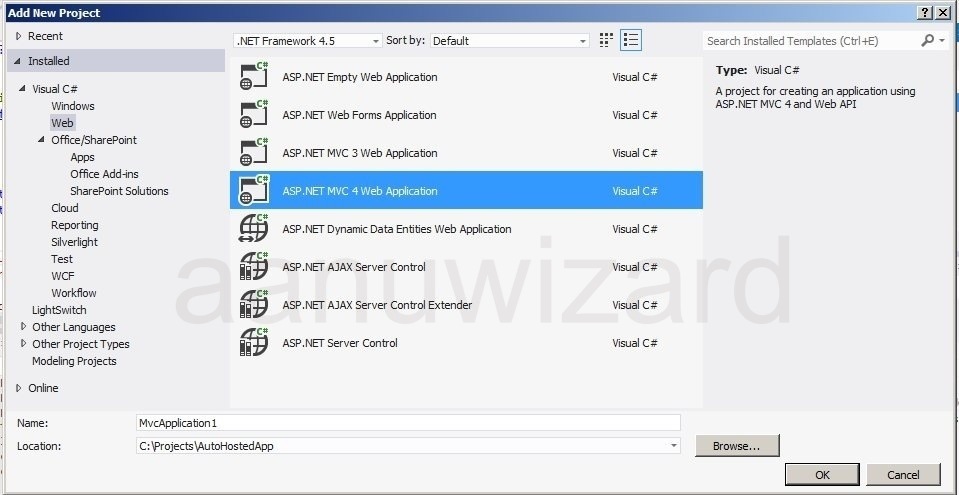
2) Add new project -> select web -> MVC4 web project and create.

20121119-170037.jpg

3) Add TokenHelper.cs file

20121119-170044.jpg

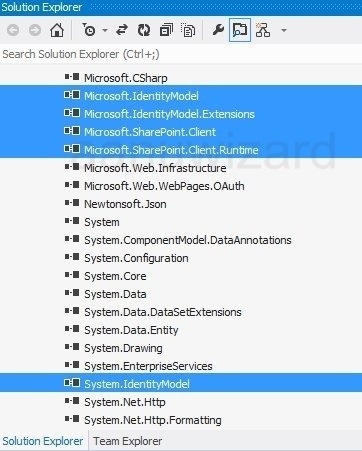
4) Add below references to MVC web project.

  1. Microsoft.Identity
  2. Microsoft.Identity.Extentions you can find it here : C:\Windows\Microsoft.Net\assembly\GAC_MSIL\Microsoft.IdentityModel.Extensions\v4.0_2.0.0.0__69c3241e6f0468ca\Microsoft.IdentityModel.Extensions.dll
  3. Microsoft.SharePoint.client
  4. Microsoft.SharePoint.client.runtime
  5. System.identitymodel

20121119-170050.jpg

5) Changes to web.config file:

Add appropriate clientId and client Secret under -> section.

6) Make sure that your MVC web is SSL enabled.

7) Now reference this MVC web project as remoteApp web project for your Auto/Provider Hosted App.

right click the SharePoint App project -> choose properties.

Change the property of SharePoint App project -> Web project => select above mvc web project

20121119-170056.jpg

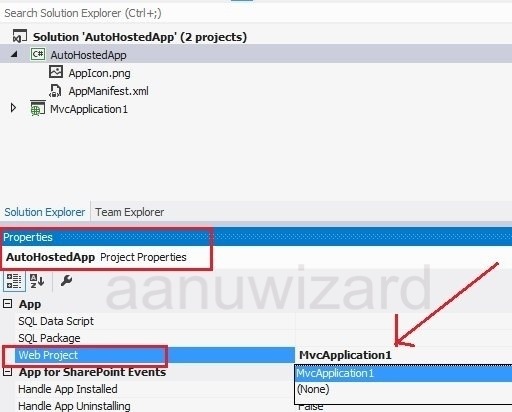
Done. Now you can use you MVC web project with SharePoint Auto/provider hosted app.

Hope that helps..!!

Article 11 from 30 : Understanding default template for provider-hosted and Auto-hosted apps

This post is article 11 from the 30 Articles App series for SharePoint

As you go further with developing apps for SharePoint, soon you will realize the limitation of SharePoint-Hosted App and you would like to step into provider/Auto-Hosted apps. This option will provide you more flexibility with the price of hosting…:P

OK then let’s start today with the default template that we get for Provider-Hosted and Auto-Hosted Apps in SharePoint 2013.

Note : SharePoint 2013 RTM is out but the VS2012 developer tools has not been upgraded yet; so this article is written for SP2013 preview version.

Step – 1 : Create auto-hosted & provider-hosted app with the default template.

Visual studio 2012-> create new project-> select Apps from SharePoint 2013 under SharePoint->Apps

choose the hosting options.

20120923-175124.jpg

Step – 2: Understanding both templates

20121104-154409.jpg

As you compare both , there isn’t any difference in project structure between provider and auto-hosted apps.
In both option, the app web is generated with default page and “TokenHelper.cs” files.

When you chose any of these option, an app web project is created. The main difference is where you host this web application and how do you reference it to your SharePoint app.

Below is what we get with auto-hosted app-manifest file.

20121104-154348.jpg

Below is what we get for provider-hosted app-manifest.

20121104-154358.jpg

AppPrincipal will tell you that this app is auto-hosted or provider-hosted.

When you chose the provider-hosted app, you should provide the exactly same client id that you have in your referenced app-web.

And by carefully changing the values in app-manifest file you can easily convert your app from provider-hosted to auto-hosted and vice-verse.

Provider-hosted app webs are hosted to any ISV providers and auto-hosted are hosted on windows-azure.

I hope today’s article will give you good understanding about the project structure of provider and auto-hosted apps.

Be more flexible in architecture and development of your apps with hosting outside of SharePoint.

Have a happy reading and don’t forget to come back for the next article.

Article 10 from 30 : Creating a Custom Action for SharePoint 2013 App


This post is article-10 from the 30 Articles App series for SharePoint.

An App can have custom action in the host web.

When I say an App it relates to all kind of SharePoint app ( sharepoint-hosted/ auto-hosted / provider-hosted )

How to create it?

  1. Open your Sharepoint App project in Visual Studio.
    Add new Item-> UI Custom Action -> Add it.
    20121023-214739.jpg
  2. Enter custom action code into the element.xml file as per your target location in ribbon and/or ECB menu and list types for this custom action. (This is similar to SP2010)

Custom action at ECB menu : (1)
<CustomAction Id=”d960b369-1187-4893-b892-8a43383541b7.HostWebCustomAction1″
RegistrationType=”List”
RegistrationId=”101″
Location=”EditControlBlock”
Sequence=”100″
Title=”Invoke MyApp’s custom action”>
<UrlAction Url=”~appWebUrl/Default.aspx?{StandardTokens}” />
<!–CustomAction>

Custom action for Ribbon area : (2)
<CustomAction Id=”75dd24d9-0c16-4ef5-be0a-f52ed0e620fa.HostRibbonCustomAction1″
RegistrationType=”List”
RegistrationId=”101″
Location=”CommandUI.Ribbon”
Sequence=”100″
Title=”Invoke MyApp’s Ribbon custom action”>
<CommandUIExtension>
<CommandUIDefinitions>
<CommandUIDefinition Location=”Ribbon.Documents.Manage.Controls._children”>
<Button
Id=”Ribbon.Library.Connect.PropertyViewer”
Alt=”Invoke MyApp’s Ribbon custom action”
Sequence=”100″
Command=”Invoke_CustomAction”
LabelText=”Invoke custom action”
TemplateAlias=”o1″/>
</CommandUIDefinition>
</CommandUIDefinitions>
<CommandUIHandlers>
<CommandUIHandler
Command=”Invoke_CustomAction”
CommandAction=”~appWebUrl/Default.aspx?{StandardTokens}”/>
</CommandUIHandlers>
</CommandUIExtension>
</CustomAction>

Make sure that you put the correct CommandAction url : ~appWebUrl is for sharepoint-hosted App and ~remoteAppUrl should be used in context with remote-hosted App.

How to access it on SP host web?

Custom actions are placed into ribbon area and/or ECB menu.

As here I have chosen Document Library as target list template => select a document => expand the (…) menu and also check the ribbon area to find custom actions.

Here is how it looks after deploying the app to your host.

20121023-214749.jpg