In this post, I will discuss about how to customize quick launch to pick up submenu items.
SharePoint populates the quick launch from site’s master page.
This post is part 1 from the Quick Launch series,
part-1 : customizing quick launch to pick up 3 or more level of sub-menu items
Part-2 : How to add 3 or more level of menu items in SharePoint quick launch
Part-3 : How to show/hide SharePoint Quick Launch for users with specific permission
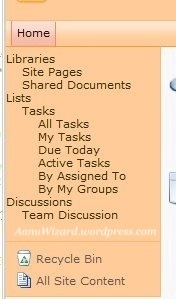
You must have noticed that by default quick launch menu items appears only with two levels.
We need to make our custom master page so lets begin.
- Open site’s default master page in SharePoint Designer.
- Copy all contents and close / uncheck out it. [Never make changes in this file]
- Create your custom master page and paste all contents. [I believe that you have basic idea about how to create and deploy custom master page]
- Find control id=”V4QuickLaunchMenu”
- Change StaticDisplayLevels=”3″ MaximumDynamicDisplayLevels=”3″
- Save and deploy it to your site.
- Go to SharePoint Designer -> Open your site -> MasterPages -> choose your custom master page
- Right click and select ‘Set as Default Master Page’.
- Do IISRESET if required and check your site in browser to view changes
- Change StaticDisplayLevels and MaximumDynamicDisplayLevels property as per the level of menu items you want to display in Quick Launch.

Hope that helps..!!

2 thoughts on “SharePoint 2010: customizing quick launch to pick up 3 or more level of sub-menu items : part-1”
Comments are closed.