SharePoint 2010 : How to add menu items at 3 or more level in quick launch -part 2

This post is part 2 from the Quick Launch series,

part-1 : customizing quick launch to pick up 3 or more level of sub-menu items

Part-2 : How to add 3 or more level of menu items in SharePoint quick launch

Part-3 : How to show/hide SharePoint Quick Launch for users with specific permission

In this post, I will discuss about how to add menu items to quick launch programmatically.

There isn’t any out of box settings that will allow you to add items to quick launch at 3rd or more levels. And so going with code solution again.

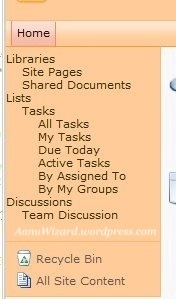
Here I am adding all views for task list at 3rd level Menu items under Tasks.

20120318-093128.jpg

You can also get quick launch from web.Navigation.GlobalNodes and customize as per what you want.

MSDN links for Quick Launch:

http://msdn.microsoft.com/en-us/library/microsoft.sharepoint.navigation.spnavigationnode.aspx

http://msdn.microsoft.com/en-us/library/ms466994.aspx

Hope that helps..!!

SharePoint 2010: customizing quick launch to pick up 3 or more level of sub-menu items : part-1

In this post, I will discuss about how to customize quick launch to pick up submenu items.

SharePoint populates the quick launch from site’s master page.

This post is part 1 from the Quick Launch series,

part-1 : customizing quick launch to pick up 3 or more level of sub-menu items

Part-2 : How to add 3 or more level of menu items in SharePoint quick launch

Part-3 : How to show/hide SharePoint Quick Launch for users with specific permission

You must have noticed that by default quick launch menu items appears only with two levels.

We need to make our custom master page so lets begin.

  • Open site’s default master page in SharePoint Designer.
  • Copy all contents and close / uncheck out it. [Never make changes in this file]
  • Create your custom master page and paste all contents. [I believe that you have basic idea about how to create and deploy custom master page]
  • Find control id=”V4QuickLaunchMenu”
  • Change StaticDisplayLevels=”3″ MaximumDynamicDisplayLevels=”3″
  • Save and deploy it to your site.
  • Go to SharePoint Designer -> Open your site -> MasterPages -> choose your custom master page
  • Right click and select ‘Set as Default Master Page’.
  • Do IISRESET if required and check your site in browser to view changes
  • Change StaticDisplayLevels and MaximumDynamicDisplayLevels property as per the level of menu items you want to display in Quick Launch.

20120314-105132.jpg

20120314-105157.jpg

Hope that helps..!!

SharePoint 2010: How to change width of list column

In this post, I will be discussing about changing width of list column.

SharePoint auto calculate the column width depends on the content at time of rendering the page.

Here I am taking an example of list column with very long header.

  • Open your view/AllItems.aspx in SharePoint Designer.
  • Get cursor to your column in design mode and drag it to desired width you want.
  • Delete Nowrap=’Nowrap’ for this column and add below highlighted style.


This is how the fixed width column will render:

Hope that helps…!!